GitHub for complete beginners
Git and GitHub are challenging tools to learn and master, but with a few simple commands and some good advice, you should be able to do enough to start contributing to MDN without too much trouble. The aim of this article is not to help you master Git or GitHub, but to give you just enough to be productive with it at a basic level and contribute to MDN.
If you are familiar with Git/GitHub basics already, you probably won't learn anything new here, but you may still find this article useful as a reference. There is a GitHub cheatsheet available too, with just the commands and none of the long explanations.
Essential concepts
The following are essential concepts that you must be familiar with to get the most out of Git and GitHub.
- Git is a version control system tool — an essential class of tools in any development workflow. It allows a group of developers to work on the same code base without getting in each other's way, stores the code base safely in a remote location, allows developers to roll the code back to previous states if required, and more.
- GitHub is a web application that provides useful tools on top of Git for working with stored codebases, as well as server space to store the codebases. Its functions are similar to those of other applications, such as GitLab or Bitbucket.
- Each codebase is stored in a container called a repository, or repo.
- Making a change to a repository minimally involves:
- Creating your own copy of that repo (called a fork).
- Creating a different version of the code in your fork of the repo (called a branch) and adding your changes to that alternative version.
- Proposing to make that change in the original copy of the repo via a pull request. You'll be learning all of these steps in this guide.
Assumptions made by this article
This article assumes that:
- You are already comfortable with using the command line/terminal. If you are new to the command line, have a read of our Command line crash course.
- You are working on a system that understands standard Unix-style command line commands. macOS/Linux have this available out of the box; Windows isn't quite as simple in this regard, but there are useful applications that emulate this functionality on Windows, such as Gitbash.
- You'll be using the command line to interact with Git/GitHub. There are a number of GUI tools available for Git and GitHub, but they won't work with this guide.
Initial setup
Before you get started with working on any particular repo, follow these steps:
- Install Git on your computer. Go to the Git downloads page, download the latest version for your computer, and install it. If you are a Windows user, you should also install the Git for Windows package, which includes Gitbash.
- While you are at it, install the other required dependencies for working locally with MDN — Node.js and yarn.
- Install Node.js by following the above link and downloading and installing the latest version for your computer.
- Once you've installed Node.js, install yarn by running
npm install --global yarn.
- Create a separate directory somewhere on your computer to store all of your Git repos in, which is easy to find and navigate to on the command line. A directory called mdn-git inside your home/user directory would be suitable.
- Sign up for a GitHub account if you don't already have one. You'll need this to contribute to MDN's repos.
Setting up SSH authentication on GitHub
At this point you need to set up an SSH key on your GitHub account. This is basically a security mechanism that identifies you to GitHub, and means that you don't have to authenticate each time you use GitHub services.
GitHub have created a useful guide to setting this up — see the starting point at Connecting to GitHub with SSH. Follow each of the steps here to get set up with SSH on GitHub.
If you don't do this, you'll still be able to contribute to MDN, but you'll have to enter your username and password every time you interact with GitHub (e.g. whenever you submit a pull request, as seen below).
Setting up to work on a specific repo
There are a number of different repos you may have to update as you work on different MDN tasks (see Where is everything on MDN? A guide to our repos), but there are a number of setup steps you should follow on every repo you work on, to make things easier and more consistent.
Forking and cloning
Forking and cloning are two terms you'll come across often in the world of Git:
- Forking means creating your own copy of a repo on GitHub.
- Cloning means making a local copy of a repo for you to work on (i.e. on your local hard drive).
It is possible to do the two things separately, but in practice you will nearly always do them together when contributing to other people's projects. You should first make a fork of each repo you want to work on. This is required for you to submit change requests to the main version of the repo (we'll learn how to create a pull request later on). Due to security reasons, you can't submit changes directly to the main version of the repo. So to submit changes, first fork the main repo, then push the changes to your fork, and then create a pull request to get the changes from your fork merged into the main repo.
Let's fork https://github.com/mdn/content right now; you'll definitely be contributing to this repo at some point. Follow these steps:
-
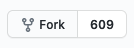
Locate the Fork button at the top-right hand corner of the content repo's page, and press it:
- A modal window will appear, asking you where you want to fork the repo to. Select your personal GitHub account. A message will appear saying something like "Forking mdn/content. It should only take a few seconds." Once GitHub has finished forking, your browser should redirect to the page for the new fork. As an example, my fork of https://github.com/mdn/content is available at https://github.com/chrisdavidmills/content.
Now you've forked the repo, it is time to clone your fork locally. To do this:
- Go to your fork's page on github.com (e.g.
https://github.com/<your-user-name>/content). -
Press the green "Code" button at the top of the files list. Something similar to the following popup should appear as a result:
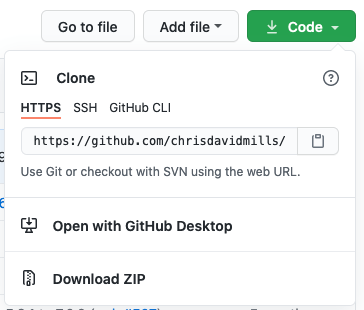
- If you set up SSH authentication as instructed above, click the "SSH" tab and copy the
git@github.com:<your-user-name>/content.gitURL from the text field in the box. If you didn't set up SSH authentication, copy the URL from the text field on the "HTTPS" tab instead, which should look like this:https://github.com/<your-user-name>/content.git. - Now open up the command line on your computer, and navigate into the directory you set up earlier to store your local git repo clones in using the cd command, e.g.
cd git - Clone your fork by entering a command with the following form:
So for example my cloning command looked like this:
git clone the-url-you-copiedgit clone git@github.com:chrisdavidmills/content.git
You should now find a content directory inside your git directory, containing the contents of the repo.
Setting up a remote to point to the main version of the repo
One last thing to do before moving on is set up a remote to point to the main version of the repo, e.g. https://github.com/mdn/content in the case of our example. A remote is basically a pointer to a specific remote repo location on GitHub, and is most commonly used to update your local clone so it is up-to-date with the latest main repo, as we'll see below.
Setting up a remote is done with the git remote add command, which looks like this:
git remote add remote-name repo-you-want-to-point-to
- remote-name is a name that you decide on, which is used to refer to the remote later on. It is good to stick to a consistent name for remotes across different repos that have the same purpose, so the same remote name will do the same thing everywhere, and you are less likely to get confused. So for example, the main version of the repo that you forked your version from is often called the "upstream repo", therefore people often use "upstream" as the name of the remote upstream location. I usually call my upstream remotes "mozilla", to signify that they point to Mozilla's main copy of the repo.
- repo-you-want-to-point-to is the SSH (or HTTPS) URL of the repo you want to point to, retrieved in the same way as we did when we were cloning our fork earlier.
So, to add your remote:
- Go to the github.com page for the main version of the repo (https://github.com/mdn/content in this example) and retrieve the SSH or HTTPS URL as appropriate, from the "Code" popup.
- In your command line,
cdinto your content directory:cd content - Now run a command along the following lines, replacing remote-name and repo-you-want-to-point-to as appropriate:
So for example, I used the SSH URL and called my remote "mozilla":
git remote add remote-name repo-you-want-to-point-togit remote add mozilla git@github.com:mdn/content.git
Your remote should now be set up. You can verify it by running the command git remote -v in your terminal, which outputs a list of your remote names and where they point to. You should see something a bit like this:
mozilla    git@github.com:mdn/content.git (fetch)
mozilla    git@github.com:mdn/content.git (push)
origin    git@github.com:chrisdavidmills/content.git (fetch)
origin    git@github.com:chrisdavidmills/content.git (push)
Preparing to make a change to the repo
Now you've got your local fork clone all set up to work with, there is a set of commands you should get in the habit of running before you attempt to make any new changes.
Switch to the main branch
Each repo has a number of different branches, which are basically different versions of the codebase inside the same repo. The idea is that for each change to a codebase, you make the change on a separate branch and test it there first, before then pushing the changes to the main copy of the code.
The main branch of the content repo is called "main" (it might be called something else like "master" in other repos, and if so you'll have to update the name of it in all commands shown below). You'll be on this branch by default if you've just cloned the repo, but if you've already done some work you'll likely be on a different branch. Make sure you run the following to switch to the main branch before doing anything else:
git switch main
Note: In other tutorials you may have seen git checkout used to change branches in a repo. That works fine most of the time, but can sometimes have unintended side-effects, therefore in this tutorial we are recommending the newer git switch command, which is designed purely for switching branches and has less chance of going wrong. If you are interested in how these commands are related, and the differences between them, Highlights from Git 2.23 > Experimental alternatives for git checkout provides a good summary.
Update your main branch
Next up, you should update your main branch so that it contains the same content as the main branch of the main repo. The content repo is updated many times every day by a large number of contributors, so if you don't do this, your version will get out-of-date, and this will cause problems when you try to submit your updates. This is where your remote will come in handy!
To update your repo:
- First fetch the updated contents of your remote with the following command:
So for example:
git fetch remote-namegit fetch mozilla - Next, replace the contents of your main branch with the remote repo's main branch. There are many different ways you could do this, but I tend to use the
rebasecommand, like this:So for example:git rebase remote-name/main-branch-namegit rebase mozilla/main - Finally, push those changes up to the remote version of your fork using:
git push
You'll know if your updates worked properly by looking at the github.com page for your fork (i.e. mine is https://github.com/chrisdavidmills/content). It should say something like "This branch is even with mdn:main." somewhere near the top. If it says your main branch is behind mdn:main by a number of commits, then you'll need to try it again, or troubleshoot.
Create a new branch to do your work in
Once you've got your main branch up to date in your fork, you must always create a new branch to make a change in. You should never do your work in the main branch and submit it from there — it can get messy very quickly, trust us. It is a lot cleaner and less error-prone to do all work in separate branches.
To create a new branch:
-
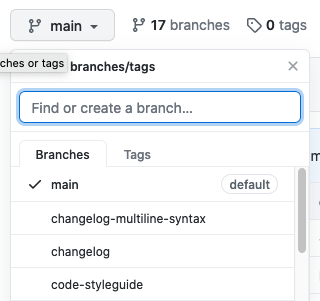
Go to your fork's page on github.com (i.e. mine is https://github.com/chrisdavidmills/content) and find the branch button at the top left hand corner of the file list, which should say "main" on it:

-
Click on this, and you'll be presented with a list of branches and a text field that says "Find or create a branch…":
-
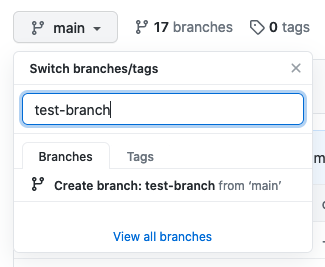
If you enter part of an existing branch name in the text field, it will filter the list of branches against that string, allowing you to search for existing branches easily. However, we want to create a new branch. Enter a branch name that doesn't already exist (try something like test-branch) and the display will change to give you a button labelled "Create branch: test-branch from 'main'":
-
Once you are happy with your branch name, click on this button, and the display will update to show the branch name in the branch button:
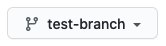
That's it! You have now created a new branch to do your work in. This branch is identical to the main branch's state at the time that you created it. A good starting point to do our work from.
Tips:
- Make sure that you always update your main branch to be in sync with the mozilla main branch, as discussed in the previous section, before creating a new branch.
- Make sure that you always create your new branch based on main, and not some other branch.To do this, makes sure that the branch button shows "main" before starting the process. If you don't, your new branch will likely be really out of date, which will create content problems.
Get your branch locally and switch to it
The previous section taught you how to create a new branch in your fork, but it currently only exists in your remote version of the fork. To work on it, you need to get it into your local version.
To do this, go back to your terminal and, making sure you are inside the repo directory you are working with (content for this example):
- Pull remote changes to your local clone by running the command
git pull - You should get a message along the lines of
* [new branch] test-branch -> origin/test-branch - To switch to your branch (meaning change over from "main", to work in that branch instead) run the command
git switch test-branch
If you were successful, git should tell you something like this:
Branch 'test-branch' set up to track remote branch 'test-branch' from 'origin'.
Switched to a new branch 'test-branch'
Note that you can check the status of your repo, including what branch you are on, at any time by running the command git status. Try this now, and git should tell you something like this:
On branch test-branch
Your branch is up to date with 'origin/test-branch'.

nothing to commit, working tree clean
This sounds about right. We are on the "test-branch" branch, and we've made no changes yet.
Adding, committing, and pushing changes
At this point you are ready to make changes to the repo you are working on — to fix a bug on MDN or whatever it is that you are doing. We will mostly skip this part, as that's not the point of the tutorial. If you want to fix a real problem on MDN, go and choose a bug to fix from our content issues list, or read Contributing to MDN for more guidance.
If you just want to follow along with this tutorial for example's sake, let's do something simple.
- Go into the
content/README.mdfile, and add a single letter into the top heading of the README. - Now go back to your command line and enter the
git statuscommand again. This time git should tell you something like this:Your branch is up to date with 'origin/test-branch'. Changes not staged for commit: (use "git add <file>..." to update what will be committed) (use "git restore <file>..." to discard changes in working directory) modified: README.md no changes added to commit (use "git add" and/or "git commit -a") - So at this point it is telling you what files you have modified. The next stage is to "add" them, which means add them to a list of files that you want to commit to push up to the remote fork. To add this file to the commit list, type the following:
git add README.mdNote:
README.mdis the path to the file you have changed, not just its name. If it were inside a subdirectory, you'd have to write the full path to the file. - If you run
git statusagain, you'll now see this:On branch test-branch Your branch is up to date with 'origin/test-branch'. Changes to be committed: (use "git restore --staged <file>..." to unstage) modified: README.md - Git is telling us that
README.mdis now in our commit list. To include all the files in the commit list in a commit (a single set of changes that we will later try to send to the main branch), enter the following (the-moption is short for message"):Git will tell you this:git commit -m 'my first commit'To show that it has registered that you've made a commit.[test-branch 44b207ef6] my first commit 1 file changed, 1 insertion(+), 1 deletion(-) - Run
git statusagain, and you'll get this information:On branch test-branch Your branch is ahead of 'origin/test-branch' by 1 commit. (use "git push" to publish your local commits) nothing to commit, working tree clean
The information readout has basically reset — it is telling us that there are no changes to commit, because we've now sent our previous change into the system as a commit. The key difference from before is the line "Your branch is ahead of 'origin/test-branch' by 1 commit." — our local version of the "test-branch" branch is now ahead of the remote version of "test-branch" by one commit — in other words, we've made a change locally that the remote branch doesn't have.
Let's send our local change to the remote branch. You can do this by running the command git push — try this now. If there are no errors, you should get a readout like this:
Enumerating objects: 5, done.
Counting objects: 100% (5/5), done.
Delta compression using up to 8 threads
Compressing objects: 100% (3/3), done.
Writing objects: 100% (3/3), 292 bytes | 292.00 KiB/s, done.
Total 3 (delta 2), reused 0 (delta 0)
remote: Resolving deltas: 100% (2/2), completed with 2 local objects.
To github.com:chrisdavidmills/content.git
    77215e31e..44b207ef6  test-branch -> test-branch
Creating a pull request
At this point, go back to your remote fork's github.com page. You should see a message along the lines of "This branch is 1 commit ahead of mdn:main. " meaning that our fork's content has a content change (commit) in it that mozilla's "main" branch doesn't have.
-
To send our change up to the main copy of the repo, we need to create a pull request. This can be easily done using the "Compare & pull request" button that you should see up the top of the files list, once the branch has had a change pushed to it.
 Press this button, and you should get a new screen appearing along these lines:
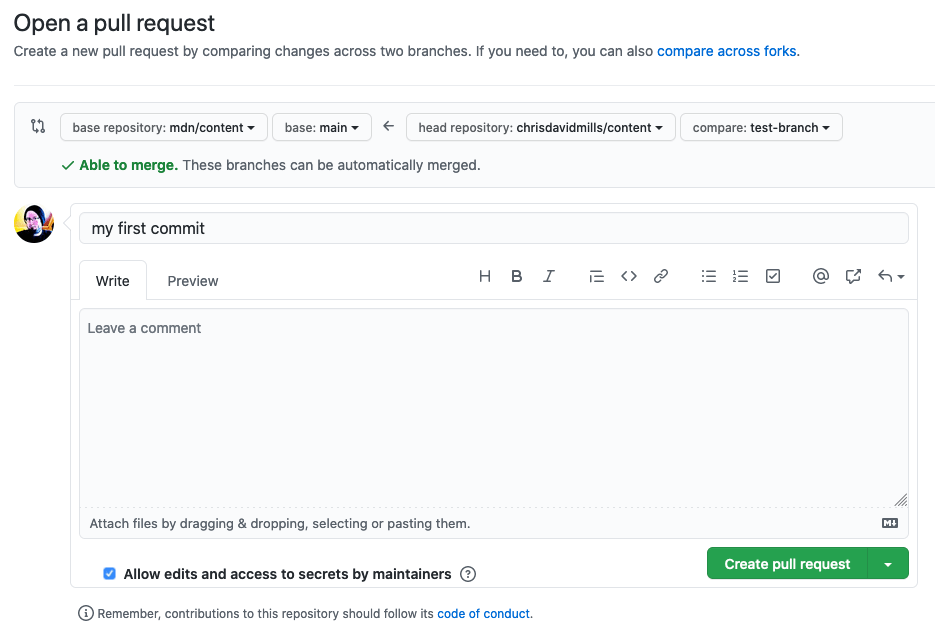
Warning: Only follow the rest of these steps if you have a real change to make to the repo! Please do not actually submit test PRs to our repos.
- At this point, enter a useful title and description for your PR, saying exactly what it changed, why this is a good thing, and what related issue it fixed, if appropriate. Specifically, include a line saying
Fixes issue-url. GitHub automatically renders this as a link to the issue number, e.g.Fixes #1234and, in addition, automatically closes the related issue once the pull request is merged. - Once you are ready to send your pull request, click the "Create pull request" button. This will cause your pull request (PR) to appear in the repo's Pull requests list, where it'll be reviewed by our review teams, and hopefully merged into the main codebase. If the review team has changes they want you to make, they'll tell you in comments in the pull request thread (you should receive an email notification to tell you this).
- If you want to make further changes to the same pull request you've already submitted, you can do so by making more commits on the same local branch and then pushing them as explained previously. There is no need to create a completely new pull request. Just make sure you are making them on the same branch as before.
Troubleshooting
The above tutorial is aimed at providing you with the basics of git and GitHub that you'll need to contribute to GitHub repos at a basic level. We hope it was helpful! We'd also like to discuss the fact that, despite being the industry standard version control system for the web industry, Git has a kind of mythical/legendary reputation as a painfully difficult tool to learn and use.
We're not sure this is entirely fair. Git has a lot of commands that are sometimes fairly cryptic in their use, and does take a long time to master. It is also fair to say that if you forget some of the commands or do things in the wrong order you can find yourself in some interesting messes that are hard to get out of. However, as long as you get yourself into some good habits as described above, you shouldn't go too far wrong. It is also worth mentioning that Git is much easier to use than it was 10 years ago.
This section will be added to over time, and includes some useful commands/sequences to help you fix common problems.
Reverting a change you made to a file that you haven't yet added to the commit list
If you've changed a file, but have not yet run the git add file-path command to add it to the commit list, you can revert it to the state it was when you first checked out the branch by running
git restore file-path
Removing a file from the commit list
If you've already run the git add file-path command to add a file to the commit list, but now want to remove it from the commit list, you can use the command
git restore --staged file-path
Reversing a commit
If you've committed the commit list using git commit -m 'my commit message', and not yet pushed it, but now realized that you put something in there that you want to remove, you can reverse your local commit using
git reset HEAD~1
This will take it back to the state when the changes in that commit are not yet added to the commit list (you would need to git add them again after figuring out the problem). Note that this gets you back to the state before you started committing anything in this session. This won't help you if you need to do something more complex, like only revert the middle commit out of a set of three. We'll leave it there for this lesson.
Reversing a commit that has been pushed to the remote fork
At this point, there is not really any going back, or rewinding. Instead, you need to push another commit to reverse the effects of the one you want to get rid of. You could do this manually using some of the tools we've already given you above, but there is a built-in command that makes this easier — git revert. This can be used to automatically create a commit that reverts changes back to the point you specify.
- At its simplest, you can run the following command to create a commit that will get your remote branch back to the state you were in before you started committing:
git revert HEAD - This will result in a commit message file being opened up in your default text editor that you need to check to make sure you are happy with it. Close this, and git will finalize creating the commit.
- Now you just need to push it:
git push
If you look at your remote fork's github.com page again, you'll see the commit that you wanted to reverse, plus the commit that reverses it.
Note: Another way to handle getting rid of files that have ended up in pull requests that you don't want to be there is to use the GitHub UI. Go to your pull request's page on github.com, go to the "Files changed" tab, and find the file you want to remove from the pull request. At the top right of the file's box in the page there will be a "three dot" (...) menu. Press this button and choose "Delete file". In the confirmation page, enter a title for the new commit, make sure the "Commit directly..." checkbox is selected, and press the "Commit changes" button.
It is usually a good idea to get the rest of the pull request looking exactly how you want it before you make changes via the GitHub UI. If you do something like this and then end up having to make more changes, you'll need to remember to pull the changes you made to your remote branch down to your local branch (e.g. with git pull) before you can push more commits.
Want to see more?
If you think this troubleshooting guide should contain more information, please create an issue to suggest what you think we should include.
See also
- MDN Learn > Git and GitHub
- Dangit, Git — additional useful troubleshooting techniques
- 45 GitHub Issues Dos and Don'ts
- gh CLI tool — once you are used to using the vanilla git CLI commands to control your repos, you might want to consider installing GitHub's own gh CLI tool, which provides commands to speed up a number of the processes discussed above.