Using Service Workers
This article provides information on getting started with service workers, including basic architecture, registering a service worker, the install and activation process for a new service worker, updating your service worker, cache control and custom responses, all in the context of a simple app with offline functionality.
The premise of service workers
One overriding problem that web users have suffered with for years is loss of connectivity. The best web app in the world will provide a terrible user experience if you can't download it. There have been various attempts to create technologies to solve this problem, and some of the issues have been solved. But the overriding problem is that there still isn't a good overall control mechanism for asset caching and custom network requests.
The previous attempt, AppCache, seemed to be a good idea because it allowed you to specify assets to cache really easily. However, it made many assumptions about what you were trying to do and then broke horribly when your app didn't follow those assumptions exactly. Read Jake Archibald's (unfortunately-titled but well-written) Application Cache is a Douchebag for more details.
Note: From Firefox 84, AppCache has been removed (bug 1619673). It is also planned for removal in Chromium 90, and is deprecated in Safari.
Service workers should finally fix these issues. Service worker syntax is more complex than that of AppCache, but the trade off is that you can use JavaScript to control your AppCache-implied behaviors with a fine degree of granularity, allowing you to handle this problem and many more. Using a Service worker you can easily set an app up to use cached assets first, thus providing a default experience even when offline, before then getting more data from the network (commonly known as Offline First). This is already available with native apps, which is one of the main reasons native apps are often chosen over web apps.
Setting up to play with service workers
These days, service workers are enabled by default in all modern browsers. To run code using service workers, you'll need to serve your code via HTTPS — Service workers are restricted to running across HTTPS for security reasons. GitHub is therefore a good place to host experiments, as it supports HTTPS. In order to facilitate local development, localhost is considered a secure origin by browsers as well.
Basic architecture
With service workers, the following steps are generally observed for basic set up:
- The service worker URL is fetched and registered via
serviceWorkerContainer.register(). - If successful, the service worker is executed in a
ServiceWorkerGlobalScope; this is basically a special kind of worker context, running off the main script execution thread, with no DOM access. - The service worker is now ready to process events.
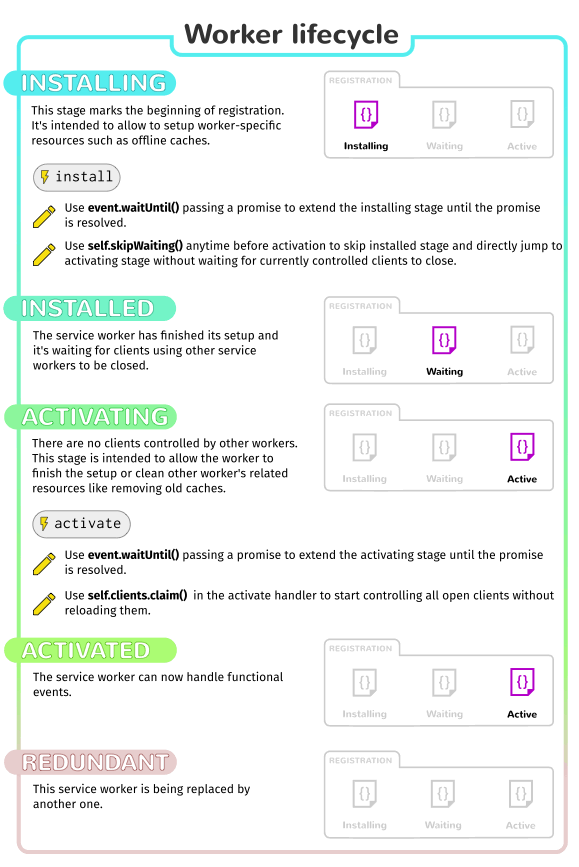
- Installation of the worker is attempted when service worker-controlled pages are accessed subsequently. An Install event is always the first one sent to a service worker (this can be used to start the process of populating an IndexedDB, and caching site assets). This is really the same kind of procedure as installing a native or Firefox OS app — making everything available for use offline.
- When the
oninstallhandler completes, the service worker is considered installed. - Next is activation. When the service worker is installed, it then receives an activate event. The primary use of
onactivateis for cleanup of resources used in previous versions of a Service worker script. - The Service worker will now control pages, but only those opened after the
register()is successful. i.e. a document starts life with or without a Service worker and maintains that for its lifetime. So documents will have to be reloaded to actually be controlled.
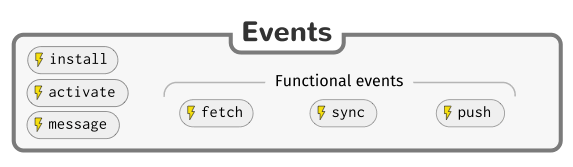
The below graphic shows a summary of the available service worker events:
Service workers demo
To demonstrate just the very basics of registering and installing a service worker, we have created a simple demo called sw-test, which is a simple Star wars Lego image gallery. It uses a promise-powered function to read image data from a JSON object and load the images using Ajax, before displaying the images in a line down the page. We've kept things static and simple for now. It also registers, installs, and activates a service worker, and when more of the spec is supported by browsers it will cache all the files required so it will work offline!

You can see the source code on GitHub, and view the example live.
Registering your worker
The first block of code in our app's JavaScript file — app.js — is as follows. This is our entry point into using service workers.
const registerServiceWorker = async () => {
  if ('serviceWorker' in navigator) {
    try {
      const registration = await navigator.serviceWorker.register(
        '/sw-test/sw.js',
        {
          scope: '/sw-test/',
        }
      );
      if (registration.installing) {
        console.log('Service worker installing');
      } else if (registration.waiting) {
        console.log('Service worker installed');
      } else if (registration.active) {
        console.log('Service worker active');
      }
    } catch (error) {
      console.error(`Registration failed with ${error}`);
    }
  }
};

// ...

registerServiceWorker();
- The if-block performs a feature detection test to make sure service workers are supported before trying to register one.
- Next, we use the
ServiceWorkerContainer.register()function to register the service worker for this site, which is just a JavaScript file residing inside our app (note this is the file's URL relative to the origin, not the JS file that references it.) - The
scopeparameter is optional, and can be used to specify the subset of your content that you want the service worker to control. In this case, we have specified '/sw-test/', which means all content under the app's origin. If you leave it out, it will default to this value anyway, but we specified it here for illustration purposes.
This registers a service worker, which runs in a worker context, and therefore has no DOM access. You then run code in the service worker outside of your normal pages to control their loading.
A single service worker can control many pages. Each time a page within your scope is loaded, the service worker is installed against that page and operates on it. Bear in mind therefore that you need to be careful with global variables in the service worker script: each page doesn't get its own unique worker.
Note: Your service worker functions like a proxy server, allowing you to modify requests and responses, replace them with items from its own cache, and more.
Note: One great thing about service workers is that if you use feature detection like we've shown above, browsers that don't support service workers can just use your app online in the normal expected fashion. Furthermore, if you use AppCache and SW on a page, browsers that don't support SW but do support AppCache will use that, and browsers that support both will ignore the AppCache and let SW take over.
Why is my service worker failing to register?
This could be for the following reasons:
- You are not running your application through HTTPS.
- The path to your service worker file is not written correctly — it needs to be written relative to the origin, not your app's root directory. In our example, the worker is at
https://mdn.github.io/sw-test/sw.js, and the app's root ishttps://mdn.github.io/sw-test/. But the path needs to be written as/sw-test/sw.js, not/sw.js. - It is also not allowed to point to a service worker of a different origin than that of your app.
Also note:
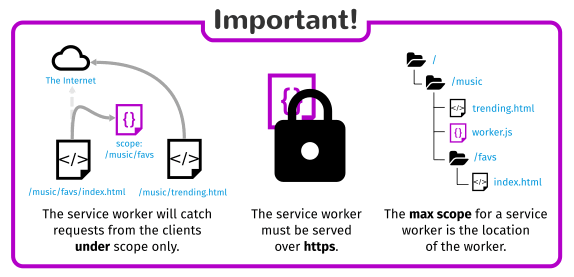
- The service worker will only catch requests from clients under the service worker's scope.
- The max scope for a service worker is the location of the worker.
- If your service worker is active on a client being served with the
Service-Worker-Allowedheader, you can specify a list of max scopes for that worker. - In Firefox, Service Worker APIs are hidden and cannot be used when the user is in private browsing mode.
Install and activate: populating your cache
After your service worker is registered, the browser will attempt to install then activate the service worker for your page/site.
The install event is fired when an install is successfully completed. The install event is generally used to populate your browser's offline caching capabilities with the assets you need to run your app offline. To do this, we use Service Worker's storage API — cache — a global object on the service worker that allows us to store assets delivered by responses, and keyed by their requests. This API works in a similar way to the browser's standard cache, but it is specific to your domain. It persists until you tell it not to — again, you have full control.
Here's how our service worker handles the install event:
const addResourcesToCache = async (resources) => {
  const cache = await caches.open("v1");
  await cache.addAll(resources);
};

self.addEventListener("install", (event) => {
  event.waitUntil(
    addResourcesToCache([
      "/sw-test/",
      "/sw-test/index.html",
      "/sw-test/style.css",
      "/sw-test/app.js",
      "/sw-test/image-list.js",
      "/sw-test/star-wars-logo.jpg",
      "/sw-test/gallery/bountyHunters.jpg",
      "/sw-test/gallery/myLittleVader.jpg",
      "/sw-test/gallery/snowTroopers.jpg",
    ])
  );
});
- Here we add an
installevent listener to the service worker (henceself), and then chain aExtendableEvent.waitUntil()method onto the event — this ensures that the service worker will not install until the code insidewaitUntil()has successfully occurred. - Inside
addResourcesToCachewe use thecaches.open()method to create a new cache calledv1, which will be version 1 of our site resources cache. Then we call a function that callsaddAll()on the created cache, which for its parameter takes an array of origin-relative URLs to all the resources you want to cache. - If the promise is rejected, the install fails, and the worker won't do anything. This is OK, as you can fix your code and then try again the next time registration occurs.
- After a successful installation, the service worker activates. This doesn't have much of a distinct use the first time your service worker is installed/activated, but it means more when the service worker is updated (see the Updating your service worker section later on.)
Note: localStorage works in a similar way to service worker cache, but it is synchronous, so not allowed in service workers.
Note: IndexedDB can be used inside a service worker for data storage if you require it.
Custom responses to requests
Now you've got your site assets cached, you need to tell service workers to do something with the cached content. This is easily done with the fetch event.
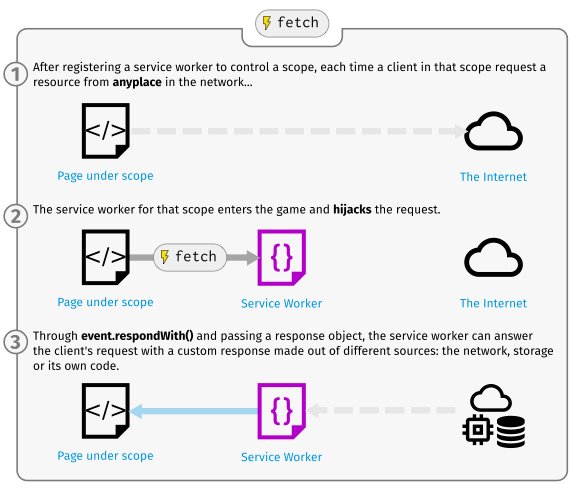
A fetch event fires every time any resource controlled by a service worker is fetched, which includes the documents inside the specified scope, and any resources referenced in those documents (for example if index.html makes a cross origin request to embed an image, that still goes through its service worker.)
You can attach a fetch event listener to the service worker, then call the respondWith() method on the event to hijack our HTTP responses and update them with your own magic.
self.addEventListener('fetch', (event) => {
  event.respondWith(
    // magic goes here
  );
});
We could start by responding with the resource whose url matches that of the network request, in each case:
self.addEventListener('fetch', (event) => {
  event.respondWith(
    caches.match(event.request)
  );
});
caches.match(event.request) allows us to match each resource requested from the network with the equivalent resource available in the cache, if there is a matching one available. The matching is done via URL and various headers, just like with normal HTTP requests.
Let's look at a few other options we have when defining our magic (see our Fetch API documentation for more information about Request and Response objects.)
- The
Response()new Response('Hello from your friendly neighborhood service worker!'); - This more complex
Responsebelow shows that you can optionally pass a set of headers in with your response, emulating standard HTTP response headers. Here we are just telling the browser what the content type of our synthetic response is:new Response('<p>Hello from your friendly neighborhood service worker!</p>', { headers: { 'Content-Type': 'text/html' } }); - If a match wasn't found in the cache, you could tell the browser to
fetch()the default network request for that resource, to get the new resource from the network if it is available:fetch(event.request); - If a match wasn't found in the cache, and the network isn't available, you could just match the request with some kind of default fallback page as a response using
match(), like this:caches.match('./fallback.html'); - You can retrieve a lot of information about each request by calling parameters of the
Requestobject returned by theFetchEvent:event.request.url event.request.method event.request.headers event.request.body
Recovering failed requests
So caches.match(event.request) is great when there is a match in the service worker cache, but what about cases when there isn't a match? If we didn't provide any kind of failure handling, our promise would resolve with undefined and we wouldn't get anything returned.
Fortunately, service workers' promise-based structure makes it trivial to provide further options towards success. We could do this:
const cacheFirst = async (request) => {
  const responseFromCache = await caches.match(request);
  if (responseFromCache) {
    return responseFromCache;
  }
  return fetch(request);
};

self.addEventListener('fetch', (event) => {
  event.respondWith(cacheFirst(event.request));
});
If the resources aren't in the cache, they are requested from the network.
If we were being really clever, we would not only request the resource from the network; we would also save it into the cache so that later requests for that resource could be retrieved offline too! This would mean that if extra images were added to the Star Wars gallery, our app could automatically grab them and cache them. The following would do the trick:
const putInCache = async (request, response) => {
  const cache = await caches.open("v1");
  await cache.put(request, response);
}

const cacheFirst = async (request) => {
  const responseFromCache = await caches.match(request);
  if (responseFromCache) {
    return responseFromCache;
  }
  const responseFromNetwork = await fetch(request);
  putInCache(request, responseFromNetwork.clone())
  return responseFromNetwork;
};

self.addEventListener('fetch', (event) => {
  event.respondWith(cacheFirst(event.request));
});
If the request url is not available in the cache, we request the resource from the network request with await fetch(request). After that, we put a clone of the response into the cache. The putInCache function uses caches.open('v1') and cache.put() to add the resource to the cache. The original response is returned to the browser to be given to the page that called it.
Cloning the response is necessary because request and response streams can only be read once. In order to return the response to the browser and put it in the cache we have to clone it. So the original gets returned to the browser and the clone gets sent to the cache. They are each read once.
What might look a bit weird is that the promise returned by putInCache is not awaited. But the reason is that we don't want to wait until the response clone has been added to the cache before returning a response.
The only trouble we have now is that if the request doesn't match anything in the cache, and the network is not available, our request will still fail. Let's provide a default fallback so that whatever happens, the user will at least get something:
const putInCache = async (request, response) => {
  const cache = await caches.open("v1");
  await cache.put(request, response);
};

const cacheFirst = async ({ request, preloadResponsePromise, fallbackUrl }) => {
  // First try to get the resource from the cache
  const responseFromCache = await caches.match(request);
  if (responseFromCache) {
    return responseFromCache;
  }

  // Next try to get the resource from the network
  try {
    const responseFromNetwork = await fetch(request);
    // response may be used only once
    // we need to save clone to put one copy in cache
    // and serve second one
    putInCache(request, responseFromNetwork.clone());
    return responseFromNetwork;
  } catch (error) {
    const fallbackResponse = await caches.match(fallbackUrl);
    if (fallbackResponse) {
      return fallbackResponse;
    }
    // when even the fallback response is not available,
    // there is nothing we can do, but we must always
    // return a Response object
    return new Response('Network error happened', {
      status: 408,
      headers: { 'Content-Type': 'text/plain' },
    });
  }
};

self.addEventListener("fetch", (event) => {
  event.respondWith(
    cacheFirst({
      request: event.request,
      fallbackUrl: "/sw-test/gallery/myLittleVader.jpg",
    })
  );
});
We have opted for this fallback image because the only updates that are likely to fail are new images, as everything else is depended on for installation in the install event listener we saw earlier.
Service Worker Navigation Preload
If enabled, the navigation preload feature starts downloading resources as soon as the fetch request is made, and in parallel with service worker bootup. This ensures that download starts immediately on navigation to a page, rather than having to wait until the service worker has booted. That delay happens relatively rarely, but is unavoidable when it does happen, and may be significant.
First the feature must be enabled during service worker activation, using registration.navigationPreload.enable():
const enableNavigationPreload = async () => {
  if (self.registration.navigationPreload) {
    // Enable navigation preloads!
    await self.registration.navigationPreload.enable();
  }
};

self.addEventListener('activate', (event) => {
  event.waitUntil(enableNavigationPreload());
});
Then use event.preloadResponse to wait for the preloaded resource to finish downloading in the fetch event handler.
Continuing the example from the previous sections, we insert the code to wait for the preloaded resource after the cache check, and before fetching from the network if that doesn't succeed.
The new process is:
- Check cache
-
Wait on
event.preloadResponse, which is passed aspreloadResponsePromiseto thecacheFirstfunction. Cache the result if it returns. - If neither of these are defined then we go to the network.
const addResourcesToCache = async (resources) => {
  const cache = await caches.open('v1');
  await cache.addAll(resources);
};

const putInCache = async (request, response) => {
  const cache = await caches.open('v1');
  await cache.put(request, response);
};

const cacheFirst = async ({ request, preloadResponsePromise, fallbackUrl }) => {
  // First try to get the resource from the cache
  const responseFromCache = await caches.match(request);
  if (responseFromCache) {
    return responseFromCache;
  }

  // Next try to use (and cache) the preloaded response, if it's there
  const preloadResponse = await preloadResponsePromise;
  if (preloadResponse) {
    console.info('using preload response', preloadResponse);
    putInCache(request, preloadResponse.clone());
    return preloadResponse;
  }

  // Next try to get the resource from the network
  try {
    const responseFromNetwork = await fetch(request);
    // response may be used only once
    // we need to save clone to put one copy in cache
    // and serve second one
    putInCache(request, responseFromNetwork.clone());
    return responseFromNetwork;
  } catch (error) {
    const fallbackResponse = await caches.match(fallbackUrl);
    if (fallbackResponse) {
      return fallbackResponse;
    }
    // when even the fallback response is not available,
    // there is nothing we can do, but we must always
    // return a Response object
    return new Response('Network error happened', {
      status: 408,
      headers: { 'Content-Type': 'text/plain' },
    });
  }
};

// Enable navigation preload
const enableNavigationPreload = async () => {
  if (self.registration.navigationPreload) {
    // Enable navigation preloads!
    await self.registration.navigationPreload.enable();
  }
};

self.addEventListener('activate', (event) => {
  event.waitUntil(enableNavigationPreload());
});

self.addEventListener('install', (event) => {
  event.waitUntil(
    addResourcesToCache([
      '/sw-test/',
      '/sw-test/index.html',
      '/sw-test/style.css',
      '/sw-test/app.js',
      '/sw-test/image-list.js',
      '/sw-test/star-wars-logo.jpg',
      '/sw-test/gallery/bountyHunters.jpg',
      '/sw-test/gallery/myLittleVader.jpg',
      '/sw-test/gallery/snowTroopers.jpg',
    ])
  );
});

self.addEventListener('fetch', (event) => {
  event.respondWith(
    cacheFirst({
      request: event.request,
      preloadResponsePromise: event.preloadResponse,
      fallbackUrl: '/sw-test/gallery/myLittleVader.jpg',
    })
  );
});
Note that in this example we download and cache the same data for the resource whether it is downloaded "normally" or preloaded.
You can instead choose to download and cache a different resource on preload.
For more information see NavigationPreloadManager > Custom responses.
Updating your service worker
If your service worker has previously been installed, but then a new version of the worker is available on refresh or page load, the new version is installed in the background, but not yet activated. It is only activated when there are no longer any pages loaded that are still using the old service worker. As soon as there are no more such pages still loaded, the new service worker activates.
You'll want to update your install event listener in the new service worker to something like this (notice the new version number):
const addResourcesToCache = async (resources) => {
  const cache = await caches.open('v2')
  await cache.addAll(resources);
}

self.addEventListener('install', (event) => {
  event.waitUntil(addResourcesToCache(
    [
      './sw-test/',
      './sw-test/index.html',
      './sw-test/style.css',
      './sw-test/app.js',
      './sw-test/image-list.js',

      …

      // include other new resources for the new version...
    ]
  ));
});
While this happens, the previous version is still responsible for fetches. The new version is installing in the background. We are calling the new cache v2, so the previous v1 cache isn't disturbed.
When no pages are using the current version, the new worker activates and becomes responsible for fetches.
Deleting old caches
You also get an activate event. This is generally used to do stuff that would have broken the previous version while it was still running, for example getting rid of old caches. This is also useful for removing data that is no longer needed to avoid filling up too much disk space — each browser has a hard limit on the amount of cache storage that a given service worker can use. The browser does its best to manage disk space, but it may delete the Cache storage for an origin. The browser will generally delete all of the data for an origin or none of the data for an origin.
Promises passed into waitUntil() will block other events until completion, so you can rest assured that your clean-up operation will have completed by the time you get your first fetch event on the new service worker.
const deleteCache = async key => {
  await caches.delete(key)
}

const deleteOldCaches = async () => {
   const cacheKeepList = ['v2'];
   const keyList = await caches.keys()
   const cachesToDelete = keyList.filter(key => !cacheKeepList.includes(key))
   await Promise.all(cachesToDelete.map(deleteCache));
}

self.addEventListener('activate', (event) => {
  event.waitUntil(deleteOldCaches());
});
Developer tools
Chrome has chrome://inspect/#service-workers, which shows current service worker activity and storage on a device, and chrome://serviceworker-internals, which shows more detail and allows you to start/stop/debug the worker process. In the future they will have throttling/offline modes to simulate bad or non-existent connections, which will be a really good thing.
Firefox has also started to implement some useful tools related to service workers:
- You can navigate to
about:debuggingto see what SWs are registered and update/remove them. - When testing you can get around the HTTPS restriction by checking the "Enable Service Workers over HTTP (when toolbox is open)" option in the Firefox Developer Tools settings.
- The "Forget" button, available in Firefox's customization options, can be used to clear service workers and their caches (bug 1252998).
Note: You may serve your app from http://localhost (e.g. using me@localhost:/my/app$ python -m SimpleHTTPServer) for local development. See Security considerations